Yoast SEO is in the top 20 active plugins on WordPress.org and is the most popular SEO plugin in the WordPress space.
They pioneered lots of the features which are now standard in SEO plugins. They are also experts in SEO, they have an awesome site that covers every aspect of SEO and a great deal of related subjects like user experience, analytics and content production. They offer classes, certifications and their newsletter can be really useful.
We are going to be using their plugin since it has every feature you want to to begin. And it is very extensible. In case you’ve got special needs like e-commerce, local or videos SEO they’ve extensions for each of those. They also have a good deal of features built into the primary plugin, like sitemaps.
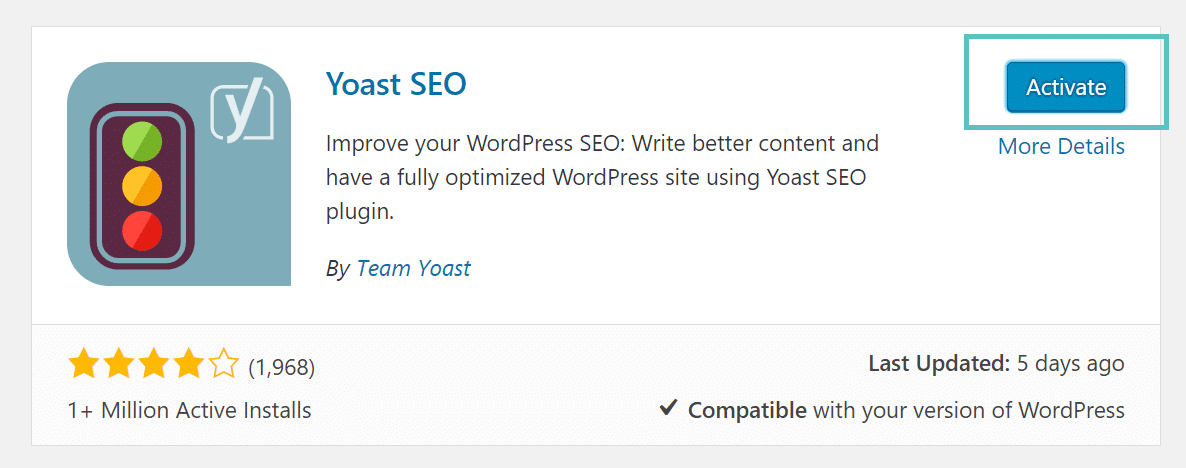
Let’s begin with this plugin. That is basically it, you will see a new item in the menu and you will see an icon in the Admin pub. One of the neat features about Yoast SEO, is the fact that it includes a really wonderful import feature. When you have previously configured an search engine optimization plugin, it is going to ask you to import those settings into Yoast.
I handicapped All in One SEO Pack earlier this movie. I will enable it, and then we will see the choice to import settings into Yoast SEO. I’ll return to the dashboard. That is the one that we want to perform. I will go here, the plugin All in One SEO was discovered, do you need to import its own settings?
It looks like we have imported all of the settings. It has now migrated the general site settings, as well as the preferences on each post. If you just had to update the site-wide settings, then it might only have a few minutes. But if you’ve added SEO information to your articles, it can be quite putzy to redo all of that work.
This import feature solves this problem. So in the event you’ve added SEO advice to your posts, I definitely suggest going through this import procedure. And merely to demonstrate that it is working, I will go to one of those articles that we configured earlier in this program. The article about pumpkin pie. Posts.
We have installed the plugin and imported a few configurations. Let us click on Yoast from the menu to get into the Dashboard here, and we’ll be taken to a screen that shows us our mistakes and Notifications. If your website isn’t indexable by Google you will see a major error here.
Be sure to look after that before you start. And then down here we will see the Notifications. We could configure each setting manually, but the setup wizard has an extremely helpful step-by-step approach. Let us go through this wizard. The premier step is asking us to register for their newsletter.
I often subscribe to newsletters and then unsubscribe after one or two mails if they are not fantastic. The next step is around the health of the planet, how are you creating the website? Is that a manufacturing site, which is a live website, is that this Staging, or is this Development, meaning running on your own machine? For this site let us say Staging.
And then they ask us what sort of site we are running. The following step here is mainly for their information, so that they know who is using their plugin. I will go ahead and pick Small enterprise. And the next step informs Google if you are a Business or a Person. This can help Google exhibit the very best information on the search engine result pages. As a quick example, if we Google Thomas Jefferson, then you will see the biographical information like date of birth and a number of pictures and other details regarding Thomas Jefferson along the right here.
Versus when we type in Microsoft, Google understands that Microsoft is a business and it’s information about the Stock price and when the business was Founded and lots of this information comes from particular search engine optimization information. Let us go back. I’ll select Business. And let’s go ahead and pick an image. I will select one from my Media Library, that looks great. Let us click Next. On this next screen we can add all of our social networking accounts.
Now you don’t need to bring every single one, you can simply add those that you use. I will add Facebook, Twitter, Instagram, and Pinterest, because those are the ones which we use. This next step is all about what you need to appear in search engines. For the most part we will want to show Articles and Pages, but we could conceal Media.
That means sort of social networking files, like pictures. And in case you have any custom article types they will show up here. We can present our Portfolio Items. This next step is all about Multiple authors and we will just go on and say No, it will essentially be one individual writing. And this next step enables us to link to Google Search Console. This allows Yoast to bring any mistakes in Google Search Console and reveal them in our WordPress Dashboard.
I find this super useful, since I never log in to Google Search Console, so being able to see the mistakes in my WordPress Dashboard is super useful. This is obviously not a great user experience, so when Google notices that they will log the error and the next time you pop in to your website you will see the note from Yoast. I definitely recommend doing so. 1 thing to notice is that you have to already have your website in Google Search Console to link it at this stage.
Here is my Google Search Console and you can see that I have already added the website. So if your website is set to HTTPS WWW be certain that you have that in Google Search Console. In our case I have it set to http, so I want to be certain that my real site uses http, which it is doing. You have probably already entered your website name.
If you wish to change you could do it here, and then you can alter the Separator. Finally this does not matter much, it is just want you need your separators to be in the search engine result pages. I will go ahead and proceed with the Pipe.
And we are done, we have configured all of the basic settings that we require for our website. Now that we have configured the site wide search engine optimization configurations we can jump right into arguably the most useful attribute in Yoast SEO, which is the ability to alter your SEO for every blog page or post.
This probably happened because from the Welcome Wizard I selected Staging Website. Allow me to show you how you can repair this because we want our website to be indexed. I will click here. If you return to Yoast you will see that the error’s gone. Now let us go ahead and alter our articles. I will go to Posts. And let us pick A Cake Decorator’s Essential Tools.
We already have a name and content for this post, so it is just about ready. This metabox includes a snippet preview, in addition to a place to put in a focus key word and a meta description. Let us stat with this preview here.
A Cake Decorator’s Essential Tools is fine but I think we could make it a little more compelling. So I will go ahead and go over to CoSchedule that has an wonderful headline analyzer tool. Let us type in our initial article and see what score they give us. I will go ahead and fill out these. And now they will analyze our headline. It looks like this receives a score of 47. Not great. Let us go ahead and make this a little more compelling.
Rather than A Cake Decorator’s Essential Tools let us try something like, Tools I use everyday to decorate exquisite cakes. This gets a much better score. Still not perfect but a good deal better than 47. There is also the Writing Headlines class in the library.
For right now though this is far better so I will keep this, then I will go up here, and because this is more persuasive, I will go ahead and place the name in right here. I may also use the separators from the website name. I’ll paste the name in and I’ll make use of these placeholders to fill in the rest. That seems a little bit better.
I really do recommend capitalizing everything. The meta description shouldn’t be left to the default. The default is generally pretty terrible. To get a post they almost always catch the premier sentence. When I compose my meta descriptions I love to continue where the headline left off. Then we could add a little more because we have additional space.
The next step down here is this attention keyword. Consider the keyword as what you would like people to type into the search engine to find your website. Now keyword research is just another gigantic topic.
We’ve got a comprehensive course here in the library. But for right now let’s go with a clear key word like cake decorating tools. And this is an excellent time to point out that key words do not need to be just 1 word. In reality they are usually a string of many words. If we tab from the box that is where Yoast SEO really shines.
The plugin gives you a listing of best practices and then ranks them from red to orange to green. You can see right now that we have only just begun optimizing our website article. You need to get as many green lights as possible but you do not need to obsess.
It is possible to tweak the name a little more, tweak the wording a little more, perhaps add a few links or images. The 1 thing I try to do each time is make sure that I haven’t used that key word before. If a person types in “cake decorating instruments”, Google should know exactly which page to display from the SERP. On my private site I have a tendency to have three quarters of those green. A simple one to change is your meta description.
Let us go ahead and do this simply to show you how this works. I will scroll up. And now I have another one green. One other nice feature in Yoast is your readability score. I am able to click over here and see how easy it’s to read my articles. Again you do not have to obsess with the score but do take note. I often write with plenty of passive voice rather than active voice and tools such as this help me grab that and fix it making the action much clearer to the reader.
That means you can spend some time here optimizing each of these various things. Whenever you are done just scroll up, click Update, and you are done on this post. Along with incorporating SEO information to each page, we could even add info for social networks. If we’re taking a look at the Yoast SEO meta box on the edit article page, we can add information for social networks with this little icon right here. Then we could configure this per social media.
If you do not see anything here, you will need to be certain that you’ve got open chart empowered, under Yoast SEO and then societal, and then Facebook. If you do not have this enabled, you won’t have the ability to add anything. I’ll return to my article, and on this page, we could define a name, description and picture for Facebook. Now this uses open chart, which many social networks utilize so if you define an image for Facebook, it will also work for Pinterest.
Same goes for the name and description. There’s yet another setting that I would like to change here. If I return to Yoast SEO and back to societal, and after that I head to Twitter, I like to modify the default card type to outline with big picture. Now, Twitter does not need to honor this, but when they think it’s best, they will incorporate the really major summary and picture in our tweet. Now we can define, names, descriptions and graphics per social network.